In my previous post, I explained how TPM disk encryption works and how simply including PCR 9 fixes a relatively major security hole in many setups. This time I'm looking at a hardware attack, bus sniffing. This attack also works against Windows BitLocker, although the solution can't be implemented on Windows unless you happen to work at Microsoft.
Going Further: Bus Sniffing Attack
Bus sniffing is directly reading data by measuring the wires of a communication bus. This attack has been demonstrated several times, mostly using logic analyzers which are relatively expensive (the analyzer we used is about $1500).
Recently, stacksmashing managed to implement the attack on BitLocker using a $5 RPi Pico against certain systems, bringing the difficulty down further.
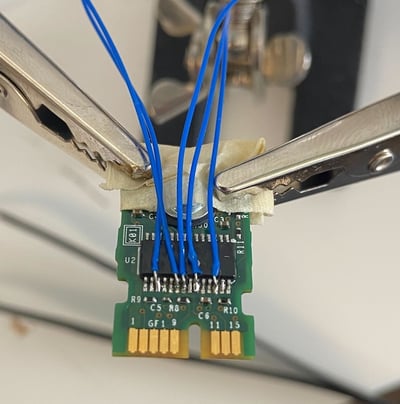
After connecting the wires, it only takes a small amount of effort to parse the TPM commands and obtain the disk key. I'll keep the details lighter here since this attack has been covered more thoroughly. Basically, you need to record the signals traveling over the bus, identify the TPM command that unseals the disk key, and then save that key. It's surprisingly easy, and I can recommend it as a fun project if you're just getting into hardware hacking.
There is a way to stop this attack, however. TPMs support a feature called parameter encryption, which encrypts the data as it's sent between the TPM and the main system. Parameter encryption uses asymmetric crypto to derive a shared key between the main system and the TPM, so it's not possible to decrypt the data without actively tampering with the messages.
Parameter Encryption
Enabling parameter encryption is a somewhat strange process and requires context. A TPM command is broken into several components. There's a header, authorization area, and command data. The header identifies the command and its size. The command data is just that. The authorization area is the weird part. It contains references to preexisting authorization sessions, which are created with a separate command. These sessions contain the information used to authorize a command, such as a password or PCR measurement. Once the session has been created, it can be used by putting a reference to it in the authorization area of a command. Despite being called authorization sessions, they are also used to enable parameter encryption. They're created in the same way, just with different options when creating the session.
For example, here are the commands needed to enable parameter encryption on an unseal command using the tpm2-tools CLI.
Create the primary key.
tpm2 createprimary --key-context primary.ctx
Create a sealed object.
echo 'testdata' | tpm2 create --parent-context primary.ctx --public sealed.pub --private sealed.priv --sealing-input -
Load the sealed object into the TPM.
tpm2 load --parent-context primary.ctx --public sealed.pub --private sealed.priv --key-context sealed.ctx
Set up the parameter encryption session, using the primary key as the asymmetric key for negotiation.
tpm2 startauthsession --hmac-session --tpmkey-context primary.ctx --session enc.ctx
tpm2 sessionconfig --enable-encrypt enc.ctx
Run the actual unseal command.
tpm2 unseal --session enc.ctx -c sealed.ctx
An attacker sniffing the bus wouldn't be able to see the value testdata.
Using Parameter Encryption with LUKS Disk Encryption
We can now build a disk encryption setup that protects against both of these issues. It will measure PCR 9 to protect the initramfs and encrypt the disk key in transit.
Unfortunately, building support for parameter encryption into existing disk encryption frameworks, Clevis or systemd-cryptenroll, would be somewhat complex. Unless there's a strong community push for the changes to be made, it's unlikely that either will support parameter encryption in the near future. It is still possible to set it up, however. LUKS encrypted drives have support for decryption through an arbitrary shell script. Using this, we can write our own script that uses tpm2-tools to obtain the disk key.
This is probably not a production-ready setup. It's somewhat inefficient and may not fail gracefully if certain parts break. But I think there's still some value to be gained here, even if it's just as an exercise.
Steps
1. Install the OS to an encrypted partition. Make sure that the encryption uses LUKS.
2. Install both tpm2-tools and cryptsetup
3. Create a working directory mkdir /paramencrypt & cd /paramencrypt
4. Create a second LUKS key dd if=/dev/urandom bs=256 count=1 | md5sum | awk -F ' ' '{printf($1)}' > key.txt
5. Add the key crypsetup luksAddKey --new-keyfile key.txt
6. Seal the key to the TPM. This example uses PCRs that measure the firmware, firmware extensions, bootloader, Linux kernel, and initrams. It also uses evictcontrol to make the primary key persistent, so it doesn't have to regenerate the key every time it boots (saving over a minute at boot time).
shell
tpm2_createprimary -c primary.ctx
tpm2_evictcontrol -C o -c primary.ctx -o primary.persist tpm2_startauthsession -S ses.ctx
tpm2_policypcr -S ses.ctx -l sha256:0,2,4,8,9 -L policy.pol tpm2_create -C primary.ctx -L policy.pol -i key.txt -u sealed.pub -r sealed.priv
7. Create a script called get_decryptkey.sh. This script is basically the same as the steps in the previous section, but also uses PCR validation in a second auth session. It also has some error handling to allow a manually entered password if the auto-decrypt fails. (I wasted hours with extra reboots before I figured out how to do this).
shell
#!/bin/sh
tpm2 load -C /usr/lib/paramencrypt/primary.persist -u /usr/lib/paramencrypt/sealed.pub -r /usr/lib/paramencrypt/sealed.priv -c sealed.ctx >/dev/null 2>&1
tpm2 startauthsession --hmac-session --tpmkey-context /usr/lib/paramencrypt/primary.persist -S enc.ctx >/dev/null 2>&1
tpm2 sessionconfig --enable-encrypt enc.ctx >/dev/null 2>&1
tpm2 startauthsession --policy-session -S unseal.ctx >/dev/null 2>&1
tpm2 policypcr -S unseal.ctx -l sha256:0,2,4,8,9 >/dev/null 2>&1
if ! tpm2 unseal -psession:unseal.ctx -S enc.ctx -c sealed.ctx ; then /lib/cryptsetup/askpass "Automatic unlock failed. Enter passphrase: "fi
8. Create diskencrypt_hook in /etc/initramfs-tools/hooks. This hook runs when the initramfs is updated with update-initramfs. If your OS uses a different initramfs generation system, like Dracut, you'll have to figure out how to do this step with that tool. Make sure the libtss2-tcti-device library gets copied. Otherwise, the whole thing will fail with an unhelpful error message.
shell
#!/bin/sh
PREREQ=""
prereqs()
{
echo "$PREREQ"
}
case "$1" in
prereqs)
prereqs exit 0 ;;
esac

. /usr/share/initramfs-tools/hook-functions #######################################################################
# Begin real processing

# tpm2 command steps
copy_exec /usr/bin/tpm2 /usr/sbin
# dependency not captured by copy_exec: copy_exec /lib/x86_64-linux-gnu/libtss2-tcti-device.so.0 /lib/x86_64-linux-gnu

# parameter encryption steps
mkdir -p ${DESTDIR}/lib/paramencrypt
cp /paramencrypt/sealed.pub ${DESTDIR}/lib/paramencrypt
cp /paramencrypt/sealed.priv ${DESTDIR}/lib/paramencrypt
9. Update the /etc/crypttab entry to use the keyscript. Do not change the disk UUID, only the last section should be updated. This tells the disk decryption logic where to actually get the key.
dm_crypt-0 UUID=0260ff41-e644-4644-b076-0292e4e64002 none luks,discard,keyscript=/paramencrypt/get_decryptkey.sh
10. Save the existing initramfs in case something goes wrong. cp /boot/initrd.img-x.x.x-x-generic /boot/initrd.img-x.x.x-x-backup. If you need to, you can choose which initramfs you use from GRUB.
11. Regenerate the initramfs, for example, with update-initramfs -u -k all
The system should automatically decrypt. If any of the measured components change, for example, the initramfs, it should instead prompt for a password. This does mean that updates will sometimes break automatic decryption. Re-sealing the disk encryption key with startauthsession, policypcr, and create (step 6), then rebuilding initramfs again should fix it.
Conclusion
This definitely isn't an optimized script. An actual implementation should use one of the TPM APIs directly rather than calling a CLI utility. Even with that said, one thing I found to be unexpectedly important was using evictcontrol to make the primary persistent. If this is not done, the TPM has to regenerate the primary key every startup, which takes over a minute on my system. As far as I can tell, there isn't any security concern from making a handle persistent, nor is there any risk from keeping the handle saved unencrypted, as neither makes the private key accessible.
Another nice thing about the tpm2 CLI is that its functions map pretty closely to the TPM APIs, so converting this to a C program shouldn't be overly difficult.
Hopefully, this short series helped demonstrate some of the less well-known features of TPMs for disk encryption. I learned a lot about the boot process while setting up this script, but my biggest lesson from this project is the importance of PCR 9. It was shocking to realize just how easily I could take over an encrypted laptop through initramfs without any special hardware.
If you haven't read the first part of this series about the TPM Disk Encryption and Initramfs Attack, you can read it here.
About Max Arnold, Security Engineer at Security Innovation
Max Arnold, a Security Engineer with Security Innovation, is passionate about uncovering the intricacies of computers and exploring the subtle nuances of cryptography. With a background primarily in web/application penetration testing and experience in hardware assessments, Max's love for obscure details and knack for identifying vulnerabilities help him uncover hidden exploits.