This is a 2-part series where we'll explore vulnerabilities in systems that use Trusted Platform Modules (TPMs) for disk encryption, exposing the risks of unverified initramfs images and bus sniffing attacks.
In this article, we'll look at how disk encryption uses the initramfs and you'll see why using PCR 9 is so important for properly securing a system.
An Overview of TPMs in Laptop Security
Trusted Platform Modules (TPMs) are a common security chip in most non-Apple laptops, often used to support disk encryption without requiring a user to type in a password during bootup. If you've ever used BitLocker or Clevis, you're probably familiar with this design. It's a big step up in security compared to an unencrypted disk, but there are still some major weaknesses.
This post will look at two of those issues and then show how to protect against them. I'll be using Linux for both, but the second attack is also possible on a Windows system.
First, I'll look at how unverified initramfs can easily allow an attacker to bypass disk encryption. This issue seems to be overlooked in a lot of guides on disk encryption and leaves a very easy-to-exploit hole in many systems.
Second, I'll show the TPM bus sniffing or reading the decryption key by physically connecting it to the wires of the communication bus. Finally, I'll show a functional, though not fully polished, setup that protects against both of these attacks.
Understanding the Role of TPMs in Disk Encryption
TPMs are fairly complex and used in a number of scenarios. Since this post is about disk encryption, we'll focus specifically on how TPMs are used to facilitate that.
There are two related concepts that are used for disk encryption: PCR Measurements and Data Sealing
PCR Measurements
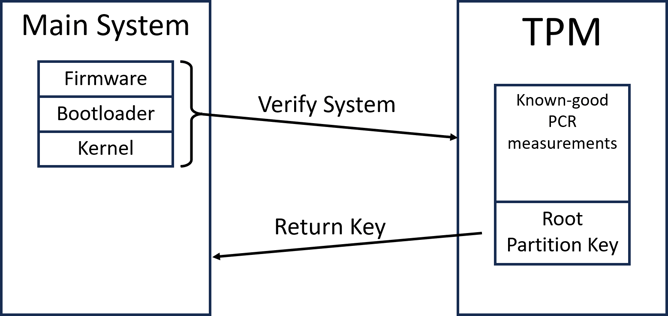
Platform Configuration Registers (PCRs) are append-only registers on the TPM that store hashes of data. They are used to keep a record of the boot process. Starting with the system firmware, sensitive code and configuration options are hashed and written to a PCR before being executed. Since the TPM won't let future code tamper with measurements made by previous stages, this allows a chain of validation to be built. Any attempts to tamper with the boot process will show up in the PCRs, as the component that was tampered with will have been measured to a PCR before it had a chance to compromise the system.
Data Sealing
Arbitrary data can also be stored (sealed) in the TPM with conditions to restrict when the TPM will release it. Specifically, these conditions can reference the values in the PCRs. If any of the boot process is tampered with, the PCRs will change, which will stop the TPM from unsealing the data. To increase flexibility, there are 24 different PCRs, each used to measure different parts of the system.
For example, PCR 0 is used to measure the system firmware, and PCR 7 measures the secure boot state. This can be helpful, allowing only the relevant measurements to be used. But it also means that you can inadvertently fail to verify important parts of the boot process. This is the first common issue; I'll exploit it and then show how to fix it below.
For disk encryption, the disk key is sealed to the TPM. So long as the system is not modified, the TPM releases the disk key without user action, and no password is required for the computer to boot. This is great from a usability perspective. Even though the system will boot without a password, an attacker still cannot pull the hard drive out and read it since they can't get the key out of the TPM. The attacker can't log in without the user password, so it's not a concern that the computer can be turned on. This is great, but it's still somewhat easy to screw up.
The Initramfs Attack
In Linux, the boot process uses a special file system called the initramfs or initrd. This is loaded before the root file system for any utilities or scripts that need to run early to set the system up fully. Disk encryption needs this because we need somewhere to put the code that actually decrypts the main file system. Since it needs to run, it can't be encrypted.
The initramfs is measured to PCR 9 in most systems, but this is not well covered. If you don't use this PCR in your sealing configuration, it's shockingly easy to bypass disk encryption completely. The initramfs is just an archived file system, so all you need to do is unpack it, modify the decryption script to print the disk key and repack it. With little prep, this attack could be done in minutes.
To show off how easy it is, I'll demonstrate the attack on a computer running Ubuntu 22.04, using Clevis for disk encryption. I've configured it to use PCRs 0, 2, 4, 7, and 8, which means the TPM checks the measurements for (in order) the firmware, extended firmware code, the boot loader, secure boot, and the kernel image. Note that this does not include the initramfs. A number of online guides will recommend something similar to this.
Code Deployment
To set this up, I installed Clevis and ran the following:
# clevis luks bind -d /dev/sda3 tpm2 '{"pcr_ids":"0,2,4,7,8"}'
When I reboot the system, it boots correctly, all the way to the login prompt. And the drive was actually encrypted since lsblk gives:
sda 8:0 0 232.9G 0 disk |
Now for the attack: I'll unplug and modify the drive on a second system. Since we don't (yet) have the key, we can only look at the data on the boot partition, /dev/sdb2.
Mounting it and then unpacking the initramfs with
mount /dev/sdb2 /evilmaid
unmkinitramfs /evilmaid /initramfs
gives a relatively large file system. The target is the file that gets the disk key from the TPM, located at main/scripts/local-top/clevis. It's a shell script, which makes it very easy to modify.
shell |
This function goes through a bunch of steps to convert and decrypt a token, ultimately getting the disk decryption key as $decrypted. All we need to do is add 4 lines to print that out, and we've obtained the disk key.
# Fail safe |
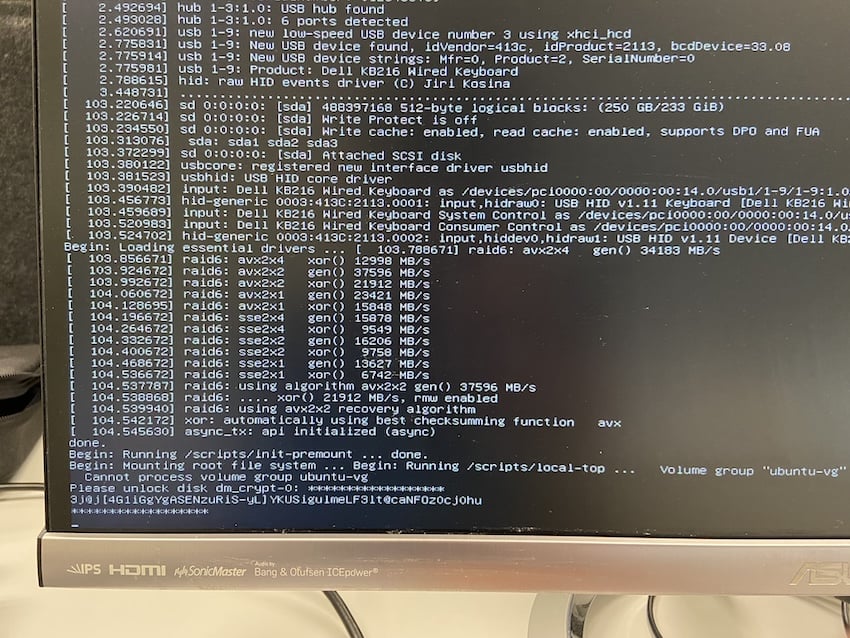
Now I can repackage the initramfs and replace the original initramfs with the modified one[1]. Reinstalling the drive in the original computer, it boots up, displays the standard log messages, and then suddenly prints out the disk key!
[1]This is somewhat of a hassle, the initramfs is actually 3 separate cpio archives, one of which is zstd compressed. Each is created separately find . -print0 | cpio -o --null --format=newc > part.cpio and then concatenated.
Protecting Initramfs With PCR 9
It's easy to stop this attack from working. All you need to do is make sure you include PCR 9 when setting up disk encryption. If you already have an encrypted drive, updating the PCR selection is easy by re-running the original command with the altered PCR set. For Clevis, this would be clevis luks bind -d /dev/sda3 tpm2 '{"pcr_ids":"0,2,4,7,8,9"}'.
If you're not using GRUB this technique may not work. Make sure to check your specific bootloader.
Other than that caveat, that's it!
Conclusion
There are still some other attacks that might be able to bypass this, but they're much more involved and probably beyond the type of threats that most people have to care about. Just adding PCR 9 to your existing selection makes a dramatic improvement in security for almost no effort.
In the follow-up to this article, I'll explain how bus sniffing defeats this system and show a way of protecting against that attack too.
About Max Arnold, Security Engineer at Security Innovation
Max Arnold, a Security Engineer with Security Innovation, is passionate about uncovering the intricacies of computers and exploring the subtle nuances of cryptography. With a background primarily in web/application penetration testing and experience in hardware assessments, Max's love for obscure details and knack for identifying vulnerabilities help him uncover hidden exploits.