
Editor’s note: original source [https://maxfieldchen.com/posts/2020-05-07-Attacking-NFC-and-RFID.html]
Testing the security of NFC and RFID
With the Proxmark by your side, badges will be laid bare.
If an engagement has an NFC or RFID component, the Proxmark is the most thorough and complete tool for the job. You can use it to evaluate card type, demonstrate card cloning attacks, enumeration-based attacks, and even perform algorithmic bypasses on password-protected cards. It’s an invaluable tool but can be a little bit finicky to set up. Below are instructions regarding common use scenarios and issues you may encounter during setup. These instructions apply to the Proxmark 3 but can be easily adapted for newer hardware versions.
Physical Setup:
Before plugging the Proxmark into a power source, always ensure that an antenna is connected. Accidentally running search commands without an antenna connected may damage the device. Ensure that the USB to micro-USB cable plugs into the computer and the USB to square (golden port on the Proxmark) cable plugs into the antenna.
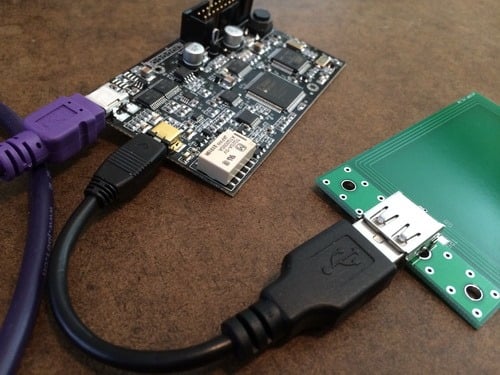
Proxmark Antenna / Hardware Setup
Mixing this up will probably damage the device, so make sure that the connections are correct before proceeding.
Flashing Firmware / Update Procedure:
Before you can start ripping through corporate badges like tissue paper, it’s best to ensure that you have the latest firmware (you need to ensure that your client matches the version of firmware installed). The repository will often be updated with new attack vectors and more card types, so it’s a good idea to stay on the bleeding edge. If you already know that your engagement will be using NFC cards with encryption, skip to the section at the bottom of this page for the community-powered fork with advanced features. The following setup guide from the Github Wiki will walk you through the building and flashing the official firmware to the Proxmark:
The only caveat I would add: do this on a native Linux machine. The Proxmark flashes over a serial interface, and virtual machines can sometimes have timing or driver issues which complicate the process. Follow the above guide’s directions to launch the client and verify the updated firmware for the first time.
Troubleshooting Steps:
If the device no longer shows up as USB after flashing, hold down the button on the Proxmark before plugging in. After 10 seconds, it should show up as a USB device. Continue holding down the button while you flash the main image. This happened to me after successfully flashing the bootloader but not being able to flash the main image. You may have to unplug and replug the physical USB device after closing the Proxmark client. Annoying but not the end of the world.
The client may need to be run as sudo in to access the /dev/ttyACM0 file.
Running the Client:
If the firmware flashed okay, you should be in the Proxmark3 repository. Run the following command to start the Proxmark command-line interface:
./client/proxmark3 /dev/ttyACM0
You may need a different dev file to access the Proxmark. You can find this using sudo dmesg | tail after plugging in the device. The created device file should show up in this system log.
Scripting actions:
Proxmark comes with a built-in LUA scripting interface, but honestly, I’ve never used it. The standard proxmark client accepts input straight from STDIN, and it’s pretty easy to whip up a Python script for your use case and pipe it directly to the client.
LF Cards (RFID):
LF (low frequency) cards typically operate at 125 or 134 kHz. They have a longer range than NFC cards, and anecdotally are less likely to have encryption mechanisms. Usually, the card can be cloned simply from the text present on the front, which can be noted in attack simulations, and devices such as the Tastic RFID Thief can steal cards from up to 3 feet away.
The antenna suitable for LF usage is circular and says “LF” on the back in white lettering. To verify that you have the correct antenna, you can run hw tune . The output should say that your HF antenna is not suitable for use, indicating that this antenna is intended for LF RFID usage. The following sections will demonstrate usage for the most common RFID keys. If the card type is unknown, first attempt to discover it with:
lf search u
HID Prox Cards:
These cards are widespread and can be implemented by several chips under the hood, including the EM4x05 or T55x7. Typically, these cards will not have password protection or encryption and can be cloned simply by knowing the card ID.
Unfortunately, brute force attacks cannot be performed automatically as HID has good proximity detection, preventing multiple reads while an antenna is detected near the reader. Here are several useful commands when working with HID Prox cards:
Detect Card ID
lf hid demod
Generate Card ID
lf hid encode <format> f <facility code> c <card number>
Clone to T55x7
lf hid clone <card identifier>
EM410x:
These cards are less common than the HID proxcards, but do exist and usually under a Honeywell brand. In any case, these cards do not rely on any advanced authentication. Cloning the card ID is enough to replicate the card. Brute forcing is possible as EM410x does not have good proximity detection. These cards can be spoofed by T55x7 chips.
Detect Card ID
lf em 410xread 1
Bruteforce Card IDs
lf em 410xbrute
Clone ID Card
lf em 410xwrite <UID> 1
HF Cards (NFC):
NFC cards typically operate at 13.56MHz, resulting in less range. Anecdotally, these cards are more likely to have strong encryption (pray you don’t get a DESFire) and are a step up from basic RFID cards. That said, plenty of models have serious flaws or no encryption at all, showing vulnerabilities similar to those noted in the RFID section. The antenna suitable for HF usage is rectangular and says RyscCorp on the reader. Ensure that the white switch is set away from the USB port, towards the RyscCorp logo. To verify that you have the correct antenna, you can run the hw tune. The output should say that your LF antenna is not suitable for use, indicating that this antenna is intended for HF NFC usage.
The following sections will demonstrate usage for the most common NFC keys. If the card type is unknown, first attempt to discover it with:
hf search u
MIFARE Classic:
Very common card used in transit (not orca cards sadly), and by various businesses. This card utilizes an authentication scheme with 2 distinct keys, which protect internal storage of 16 sectors. Each of the 16 sectors has 64 bytes. Each of the 2 keys can be coded to allow R/W to each of the 16 sectors individually. In theory, this is a pretty reasonable permission model; in practice, it almost always degrades to the following:
- One key is utilized as a “public” key, typically set to a known default so that public readers can view the key.
- The other key is utilized as a secret key which can view the rest of the data on the card.
Thanks to some serious work by Nicolas Courtois, an algorithmic bypass exists which will help us slide right by this pesky authorization model. If either of the two secret keys is known, it can be used to gain access to all the sections available from keys A and B in a nested attack. The math behind this is tricky. If interested, the presentation explaining the findings is linked in the resources section. If you don’t care for the technical bits and just want to clone some keys, take a look at the following commands:
Dump using default keys
hf mf dump
Try Default Keys
hf mf chk *1 ? d
Try Nested Attack
hf mf nested 1 0 <KEY A/B> <KEY> d
Read Specific Block
hf mf rdbl <blockNum> <KEY A/B> <Key>
Read Specific Sector
hf mf rdsc <sectorNum> <KEY A/B> <Key>
Write Specific Block
hf mf wrbl <blockNum <KEY A/B> <Key> <data (32 hex chars)>
Sniff card to reader comms
hf mf sniff
Clone card to tag (uses dumpdata.bin in current directory)
hf mf restore
Often cloning a Mifare classic card is a valid attack, but the most interesting attacks come from modifying the card’s data. This usually involves taking a dump of the card at a known state and comparing it with another dump after minimal changes. This basic form of reverse engineering can deduce what values are being stored on the card.
Take care, often there will be a checksum value stored on the card, so “replay” attacks using previously captured dumps may be the most easily demonstrable threats if the checksum is complicated. I’m confident that if you’ve made it this far into the article, you’re the sort who can reverse the checksum no sweat.
MIFARE Ultralight (C):
These cards are marketed as high-end and offer “advanced” 3DES encryption containers for the standard NDEF messages. These may or may not actually use 3DES, but it is an option here. Here’s the datasheet describing the auth protocol and relevant lockbits:
It’s important to know that you should probably keep your writes between blocks 7-39. Blocks 40 and above control the lockbits, and setting those may end up permanently(!) locking other blocks. Don’t be like me and brick a card (or three) during your engagement.
If the lockbits for authorization on sensitive bits are set, it’s worth checking to see if you can directly change the lockbits. Sometimes they set the lock but forget to lock the lockbits themselves.
Get detailed info
hf mfu i
Dump using default keys
hf mfu dump
Dump using custom keys
hf mfu dump k <KEY>
Read specific Block
hf mfu rdbl b <block_number> k <optional_key>
Write Specific Block
hf mfu wrbl b <block_number> d <data_in_hex> k <optional_key>
Experimental/Advanced Features:
There is a community-developed repository with continued development and advanced features. I have not tried flashing the firmware on my Proxmark, but if your engagement requires you to mess with any of the NFC cards utilizing serious encryption (DESFIRE ect.), you will probably need the features in this fork. I’m including a link for reference, but know that all the above commands apply to the official Proxmark repository:
Remediation
By this point, you should have gained sufficient familiarity with the Proxmark. You can tear through crummy MiFare encryption, clone HID cards, and demonstrate that an attacker could waltz into any room they like. Go use this knowledge for good, improve your clients’ security, and help guide them towards cards that use strong encryption like the DESFIRE.
For more content like this, please visit my personal blog at https://maxfieldchen.com
Additional Resources and References:
- https://blog.kchung.co/rfid-hacking-with-the-proxmark-3/
- https://hackerwarehouse.com/site-news/proxmark-first-use/
- https://github.com/Proxmark/proxmark3/wiki/Ubuntu-Linux
- http://www.nicolascourtois.com/papers/mifare_all.pdf
- https://penturalabs.wordpress.com/2013/07/15/access-control-part-2-mifare-attacks/
- http://esec-pentest.sogeti.com/posts/2011/11/28/playing-with-nfc-for-fun-and-coffee.html
- https://scund00r.com/all/rfid/2018/06/05/proxmark-cheatsheet.html
- https://blog.kchung.co/reverse-engineering-hid-iclass-master-keys/
- http://www.proxmark.org/forum/index.php
- http://www.emsec.rub.de/media/crypto/veroeffentlichungen/2011/10/10/desfire_2011_extended_1.pdf
- https://www.bishopfox.com/resources/tools/rfid-hacking/attack-tools/
- http://www.openpcd.org/images/HID-iCLASS-security.pdf
- http://www.proxmark.org/forum/viewtopic.php?id=2443